This article is on tweaking the Mercedes-Benz model 617 turbo diesel engine as used in the W123 and W126 chassis. The initial factory settings on these engines tended to be very conservative and considerable improvement in performance and drivability can be had with relatively little effort and very little cost.
NOTE: All techniques, suggestions & recommendations described herein are taken at your own risk. If you want guarantees, stay within Mercedes-Benz specifications.
Before proceeding, however, it is suggested that you first make sure that your engine is ready maintenance-wise and second, that your engine will actually benefit from the adjustment. Preliminary maintenance work (see separate articles for detailed information)
| Change oil & filter. It is extremely important to change the oil and filter regularly (every 3000 miles for conventional engine oils and every 5000 miles for Mobil 1). | |
| Adjust engine valves. This adjustment should be performed every 15,000 miles. The valve adjustment must be correct before adjusting turbo boost pressures. Take care to ensure that all the valves are adjusted equally, not just within specs. | |
| Verify fuel injection pump timing is correct. | |
| Check and clean banjo fitting and lines to the overboost switchover valve & ALDA. |
Tools Required:
 .
An accurate pressure gauge that reads in PSI or BAR.
Also, the fittings and hose to plumb the boost gauge.
.
An accurate pressure gauge that reads in PSI or BAR.
Also, the fittings and hose to plumb the boost gauge.
Step-by-step instructions:
a. Open hood to full upright position
b. Connect boost gauge to engine; two methods shown
i. Measured at intake manifold port
1.
Remove aluminum plug from rear of intake manifold
 using 5mm hex key wrench—be careful to not lose sealing washer
2. Install adapter fitting into intake manifold
3.
Connect hose to fitting in intake manifold
4. Connect boost gauge to hose and place inside car
ii. Measured at vacuum line
1. Install “T” fitting in a vacuum line near the intake manifold
2. Connect hose and boost gauge to “T” fitting
3. Connect boost gauge to hose and place inside car
c. Test boost pressure
i. Drive car until engine oil is fully warmed up—typically 15-20 minutes.
ii. Operate car at wide open throttle (WOT) at a constant 4000 RPM
1. Use the brakes and/or a hill to prevent the car from accelerating
2. Observe the pressure on the boost gauge
a.
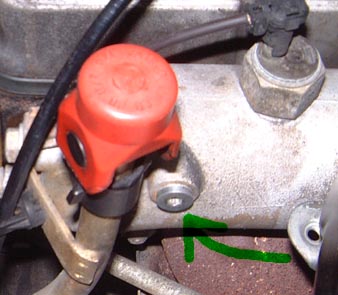
Clean the wastegate cover
i. Spray with degreaser or carburetor cleaner
ii. Spray with pressure washer and/or compressed air to remove residue
b. Remove air cleaner assembly & intake hose to turbo
i. It is always a good idea to cover the turbo inlet whenever it is exposed. A rag held in place with rubber bands or a plastic lid that fits over the inlet will do.
c.
Remove wastegate cover retaining spring
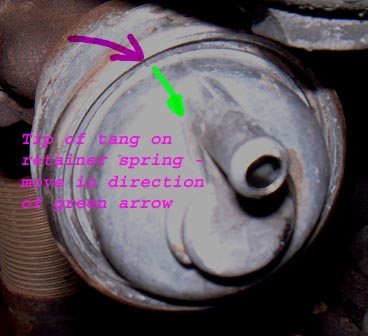
i. The spring looks somewhat like a slinky toy. The spring retainer fits into a groove in the wastegate housing. The spring is slightly larger in diameter than the housing. There is a tang at the end of the spring where you will need to use a small screwdriver to BOTH pull the tang of the spring towards the center of the wastegate AND then GENTLY START pulling it forwards towards the front of the car.
1.
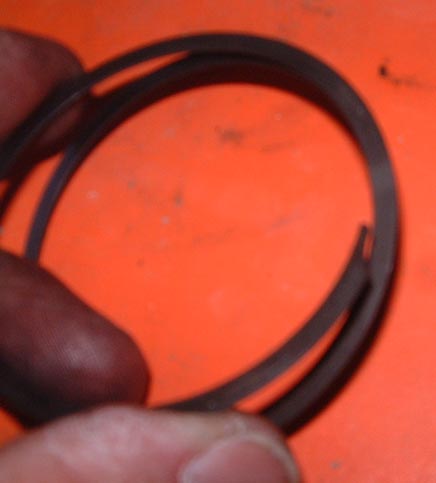
Study the images of the spring to understand the previous paragraph
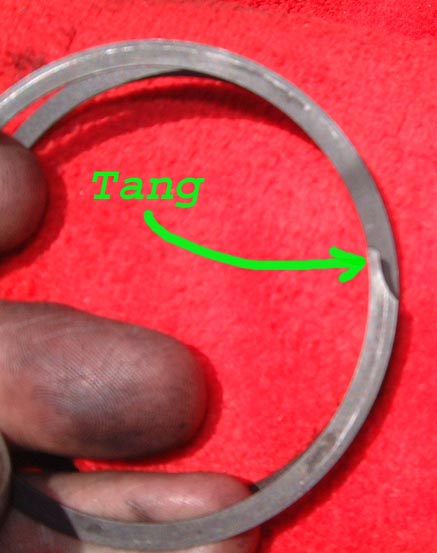
2. A small pick-type tool may help levering the tang out of the groove in the housing.
ii. Once the retainer spring has started to come out of the groove in the housing, then work a small screwdriver blade around it to gradually work the entire length of the retainer spring out of its groove.
d. Remove the wastegate cover
e.
Remove the wastegate valve locknut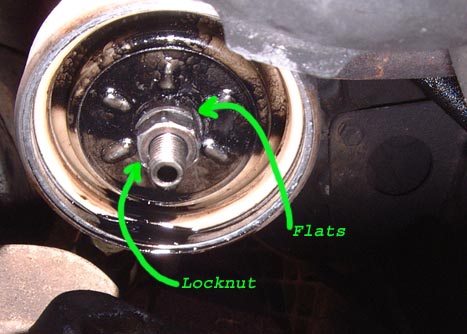
i. Hold the wastegate valve with the thin ½” open-end wrench. The wastegate valve has 2 flats for this purpose
ii. Loosen the locknut with a 13mm wrench
iii. Remove locknut completely
iv. Measure and note the length of the exposed threads on the wastegate valve
f. Adjust wastegate pressure spring
i. Rotate spring assembly CLOCKWISE using ½” wrench on the flats. The recommended initial adjustment is 3 full turns.
1. It is estimated that each fraction of an inch of thread equals a similar fraction of BAR boost. In other words, changing the exposed threads by 0.15” will change the boost by approximately 0.15 BAR.
g. Reassemble wastegate
i. Clean all parts
ii. Install and tighten locknut
iii. Position wastegate cover in place
iv. Install wastegate cover retaining spring
1. Polish or scratch one end of retaining spring to help make it visible
2. Remember that spring must be compressed—made smaller in diameter to fit into groove
3. Position spring so that the end will be accessible when assembled.
4. Start spring into groove while pressing cover into place
5. Gradually work spring around with fingers & small screwdriver. It may help to have a helper use the cotter pin tool to hold the beginning of the spring in place and hold the cover while you work the retainer spring into place
6. Set/verify that retainer spring is fully seated by tapping with a large screwdriver and hammer around the entire circumference of the spring.
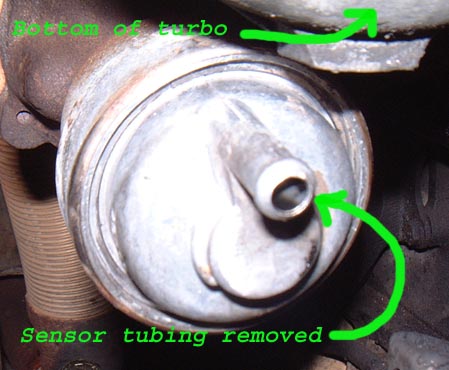
v. Install sensor hose between wastegate and intake manifold
h. Install air cleaner assembly
i. Install “U” tube duct between air cleaner and turbo inlet; if you covered the inlet of the turbo, remove cover now
i. Check your work for tools and parts, hoses disconnected, etc.
j. Re-test turbo boost pressure. If you used the 3-turn adjustment, you should see an increase of about 2 PSI in your boost pressure.